Optical surface accuracy plays a pivotal role in achieving the desired performance of optical components, delineating the variance between the intended and actual shapes of surfaces. This parameter, often quantified in terms of fringes or waves corresponding to the laser wavelength utilized in interferometry, holds significance in forestalling additional wavefront distortions that lead to aberrations and compromise system efficacy.
Various methodologies are employed to gauge optical surface accuracy, encompassing diverse techniques such as test plates, laser interferometers, laser interferometers integrated with computer-generated holograms (CGHs), contact profilometers, and coordinate measuring instruments.
Traditionally, the test plate method predating interferometry involves placing a transparent plate adjacent to a polished surface to evaluate its flatness. Utilizing monochromatic light, interference fringes manifest, and the accuracy is discerned by analyzing the fringe count and irregularities therein. The number of rings denotes the variance in radius between the two surfaces, termed power, while the spacing between identical-colored fringes signifies a height deviation of half a wavelength of the light used, indicative of irregularities.
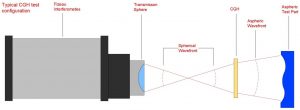
Computer-generated holograms (CGHs) serve as null lenses, supplementing interferometric testing of intricate surfaces such as aspheric and freeform shapes. Frequently integrated with laser interferometers, CGHs play a pivotal role in overseeing the surface accuracy of aspheric lenses throughout the polishing process.

Typical CGH Test Configuration
Contact profilometry, a prevalent and cost-effective approach, involves ascertaining the sag values of the test surface as a mechanical stylus traverses the element, subsequently comparing them to the nominal surface shape to gauge accuracy.
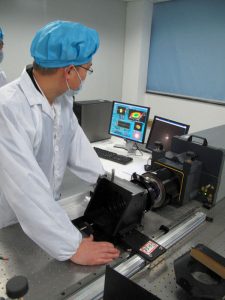
Laser interferometers employ sophisticated algorithms to meticulously ascertain optical surface accuracy by splitting a light beam into two paths of unequal length, facilitating their subsequent interference. Upon recombination, the resultant intensity modulation correlates with the amplitude and phase of the intersecting beams, generating a pattern of light and dark bands, termed interference fringes. These fringes facilitate the determination of power error and irregularities across the optical surface under scrutiny.

Zygo 6″ Verifire XP Interferometer
Coordinate measuring instruments elucidate the topography of optical surfaces through point-wise scanning and detection. Employing advanced data analysis software, surface accuracy is determined by contrasting the acquired surface data with the nominal surface profile.
Do not hesitate to contact Shanghai Optics today. We’d be more than happy to discuss your projects and how best they can become a success.