Optical Surface Specifications: Enhancing Performance and Precision
Optical surfaces, pivotal in the realm of optical components such as lenses and mirrors, are governed by stringent specifications ensuring optimal performance across various applications from microscopy to astronomy. Understanding these specifications is paramount for achieving superior light transmission, image fidelity, and system efficiency.
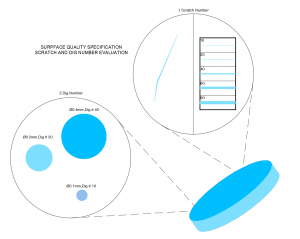
- Surface Quality: The appearance and integrity of an optical surface fall under the umbrella of “surface quality.” While certain defects like scratches, pits, and digs may seem cosmetic, they can subtly affect system throughput and increase scattered light, particularly on image plane surfaces and high-power optics. Scratch-dig specifications, such as 80-50 for standard quality and 20-10 for high precision, provide a standardized metric for assessing surface quality.
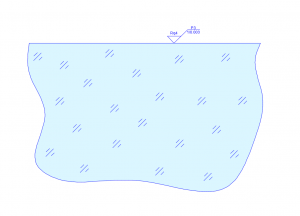
- Surface Flatness: Flatness is critical for surfaces like mirrors and lenses. Utilizing optical flats as reference surfaces, deviations in flatness are measured in interference fringes, with even fringes indicating precision flatness. Factors like manufacturing processes and environmental conditions can influence flatness, making regular inspection imperative to meet specified requirements.

Surface Quality Specification
- Surface Roughness: Microscopic unevenness, termed surface roughness, profoundly impacts product performance, influencing characteristics like wear resistance and friction coefficient. Surface roughness specifications vary based on intended application and quality standards, ranging from 50Å RMS for typical quality to 5Å RMS for high quality.
| Polishing Grade Designation |
Number, N, of Microdefects per 10mm of Sampling Length |
| P1 |
80 ≤ N ≤ 400 |
| P2 |
16 ≤ N ≤ 80 |
| P3 |
03 ≤ N ≤ 16 |
| P4 |
N < 03 |

Surface Roughness Specification
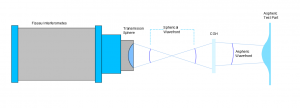
- Surface Accuracy: Optical surface accuracy, crucial for maintaining intended shape and minimizing wavefront distortions, is quantified in wavelengths or fringes. Various methodologies, including laser interferometry and computer-generated holograms, aid in accurate assessment, particularly beneficial for complex surfaces like aspheric lenses.

CGHs
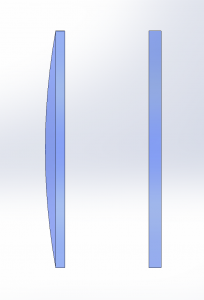
- Surface Power & Irregularity: Curved optical surfaces are evaluated for power and irregularity deviations from reference surfaces, with interference fringes used to quantify deviations. Managing irregularities becomes challenging with increased power, necessitating a balanced power-to-irregularity ratio for optimal performance.

Optical Filter Power and Irregularity
- Surface Finish: Surface finish, indicative of small-scale irregularities resulting from polishing, demands precise control to mitigate issues in laser or heat-intensive applications. Manufacturing tolerances dictate surface finish standards, ensuring consistency and performance across optical components.
Comprehending and adhering to optical surface specifications is fundamental for achieving superior optical performance and advancing optical technology. Whether it’s ensuring surface quality, flatness, roughness, accuracy, or finish, meticulous attention to detail empowers engineers and manufacturers to deliver optical components of unparalleled quality and efficiency.
Do not hesitate to contact Shanghai Optics today. We’d be more than happy to discuss your projects and how best they can become a success.
