Right-Angle Prism

Right-Angle Prism
-
- Cylindrical Lenses
- Aspheric Lenses
- Achromatic Lenses
- Spherical Lenses
- Optical Prisms
- Optical Mirrors
- Beamsplitters
- Optical Windows
- Infrared Optics
- Micro Optics
- Optical Filters
- Colored Glass Filters
- Custom Shapes
- Laser Optics
- Freeform Optics
- Fresnel Lenses
- Light Pipe Homogenizing Rods
- TIR Lens
- Medical Device Optics
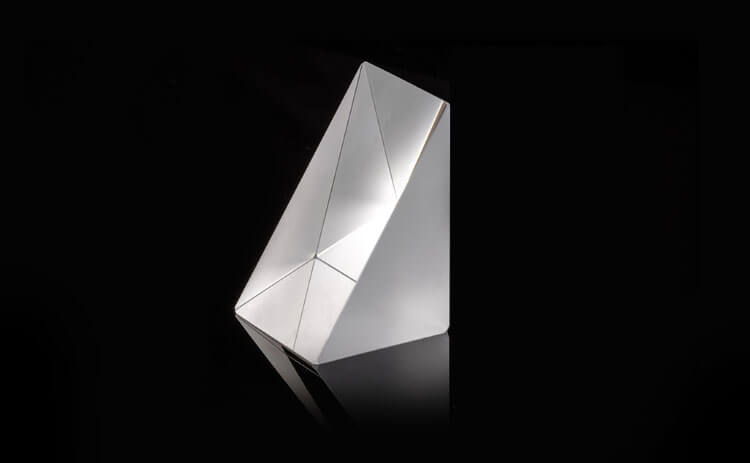
A right angle prism is an optical prism designed to deviate light by 90° or 180°, depending on the orientation of the prism and the face through which light enters. The joining edges and faces are perpendicular to the base faces, and all joining faces are rectangular.
Although many functions of a right angle prism can be accomplished with plane mirrors, prisms are easier to mount, align, and fine-tune. If the hypotenuse is used for external reflection, a metal or dielectric reflective coating can be applied.
In the standard configuration a right angle prism is oriented so that a short face (leg) faces the light source. Light entering the prism will reflect off of the hypotenuse at a 90 degree angle in total internal reflection and emerge from the other short face. An antireflection coating on the entrance and exit face can ensure high transmission.
Porro Prism
When light enters through the hypotenuse the right angle prism becomes a 180 beam retroreflector and is called a porroprism. In this configuration light will undergo a 180 deviation and return through the hypotenuse with a simple positional displacement. Images will be inverted top to bottom but not left to right. The beam elevation can be controlled by precise adjustment to the prism, and the azimuthal axis will remain invariant.
The porro prism is mainly used to alter the orientation of an image, and is often used in optical viewing instruments: for instance, telescopes, periscopes, and binoculars. Often two porro prisms, sometimes cemented together with optical cement, are used for these applications.
Dove Prism
A dove prism is a variation on the right angle prism, and is used as an image rotator. Light enters the prism through one of the legs, at an angle parallel to the hypotenuse face. It is refracted downward toward the inside of the hypotenuse, undergoes total internal reflection, and is refracted through the prisms. It exits through the other leg and proceeds in the same direction it was traveling to begin with. Dove prims are used only with collimated light because otherwise considerable astigmatism is introduced. Often, dove prisms are manufactured as a truncated right angle prism without the triangular apex. This allows the weight to be significantly reduced. Standard right angle prisms, however, can also be used.
Specification for Right Angle Prisms
At Shanghai Optics we manufacture quality right angle prisms from BK7 Grade A optical glass, Corning Fused Silica 7980, JGS1 UV Grade Fused Silica, and JGS2 UV Grade Fused Silica.
Our factory standard involves a dimension tolerance of +/-0.1 mm. The clear aperture; the portion of the optical element that meets standards, is always greater than 90%.
Flatness, which is defined as how much a surface of the prism may vary from the ideal plane, is measured in comparison with a high quality, highly precise optical flat. As the surface of the prism being tested is placed against the optical flat, fringes appear. These fringes describe the surface flatness of the face being tested. Evenly spaced, straight fringes mean that the surface of the prism is as flat as the reference flat. Curved fringes point to a deviation from flatness. Two imaginary lines are used as reference, one through the ends of a fringe and the other tangent to the center of the fringe, and the number of fringes between these two lines determines the flatness error
We measure flatness in values of waves, l or lambda, multiples of wavelengths of the testing source. 2 fringes are equal to one wave. While 1l flatness is considered typical grade and l4 flatness precision grade, our factory standard on right angle prisms limits any deviations from flatness to l/4 l @632.8 nm.
Our factory standard for surface quality is 60-40 scratch and dig number, per specification MIL-PRF-13830B. The lower the scratch dig number, the higher the surface quality. While run of the mill optics utilize 80-50 scratch dig components, 60-40 is considered precision quality.
If higher precision flatness, dimension tolerance, or surface quality is needed, please call us to discuss our manufacturing limits. Our factories are equipped with state of the art equipment and we are able to provide custom optics for any application.
Factory Standard
- Material: Material: BK7 Grade A optical glass, Corning Fused Silica 7980, JGS1, JGS2
- Dimension Tolerance: +0.0, -0.1 mm
- Clear Aperture: >90%
- Flatness: l/4 l @632.8 nm
- Surface Quality: 60-40 scratch and dig
Contact us for manufacturing limit or custom specifications.
Protective Bevel available | All measurements in mm | ||
| 3 min. deviation | 1 min. deviation | 30 sec. deviation | |
| Size | Part Number | Part Number | Part Number |
| A=B=C=3.2 | RAP-32-3M-BK7 | RAP-32-1M-BK7 | RAP-32-30S-BK7 |
| A=B=C=5.0 | RAP-50-3M-BK7 | RAP-50-1M-BK7 | RAP-50-30S-BK7 |
| A=B=C=10.0 | RAP-100-3M-BK7 | RAP-100-1M-BK7 | RAP-100-30S-BK7 |
| A=B=C=12.7 | RAP-127-3M-BK7 | RAP-127-1M-BK7 | RAP-127-30S-BK7 |
| A=B=C=15.0 | RAP-150-3M-BK7 | RAP-150-1M-BK7 | RAP-150-30S-BK7 |
| A=B=C=20.0 | RAP-200-3M-BK7 | RAP-200-1M-BK7 | RAP-200-30S-BK7 |
| A=B=C=25.4 | RAP-254-3M-BK7 | RAP-254-1M-BK7 | RAP-254-30S-BK7 |
| A=B=C=30.0 | RAP300-3M-BK7 | RAP300-1M-BK7 | RAP300-30S-BK7 |
| A=B=C=40.0 | RAP400-3M-BK7 | RAP400-1M-BK7 | RAP400-30S-BK7 |
| A=B=C=50.8 | RAP508-3M-BK7 | RAP508-1M-BK7 | RAP508-30S-BK7 |
| Note: Size A=B=C=1mm is available. Coating is available upon requirement. | |||
Need help?
We offer consultations and initial feasibility studies. If you have questions about limitations or lens capabilities we’re more than happy to work through your proposed custom components. As an unmatched custom optical provider, we’ll do everything that we can bring your vision to life.
Related Content

Optical Assembly


